
Executor Filing Checklist for Probate Court
Navigating probate as an executor can feel overwhelming, but breaking it down into clear steps simplifies the process. Here’s what you need to know:
- Probate Overview: Probate is the court-supervised process of validating a will, settling debts, and distributing assets. Not all estates require formal probate, especially smaller ones or those with assets that transfer directly to beneficiaries.
- Executor Duties: Executors handle filing the will, notifying beneficiaries and creditors, paying debts and taxes, and distributing assets. Missteps can lead to personal liability.
- Key Steps:
- Gather Documents: Obtain certified death certificates, the original will, and a detailed inventory of assets and debts.
- File Probate Petition: Submit the will, death certificate, and required forms to the court to be officially appointed executor.
- Notify Parties: Inform beneficiaries, heirs, and creditors, and publish a notice for unknown creditors.
- Inventory Assets: Value all assets and file a comprehensive inventory with the court.
- Settle Debts and Taxes: Pay valid debts, file tax returns, and resolve any claims.
- Distribute Assets: Transfer property to beneficiaries based on the will and file a final accounting with the court.
Staying organized and adhering to deadlines is crucial to completing probate efficiently. Executors should also keep detailed records to avoid disputes and ensure compliance with legal requirements.
::: @figure 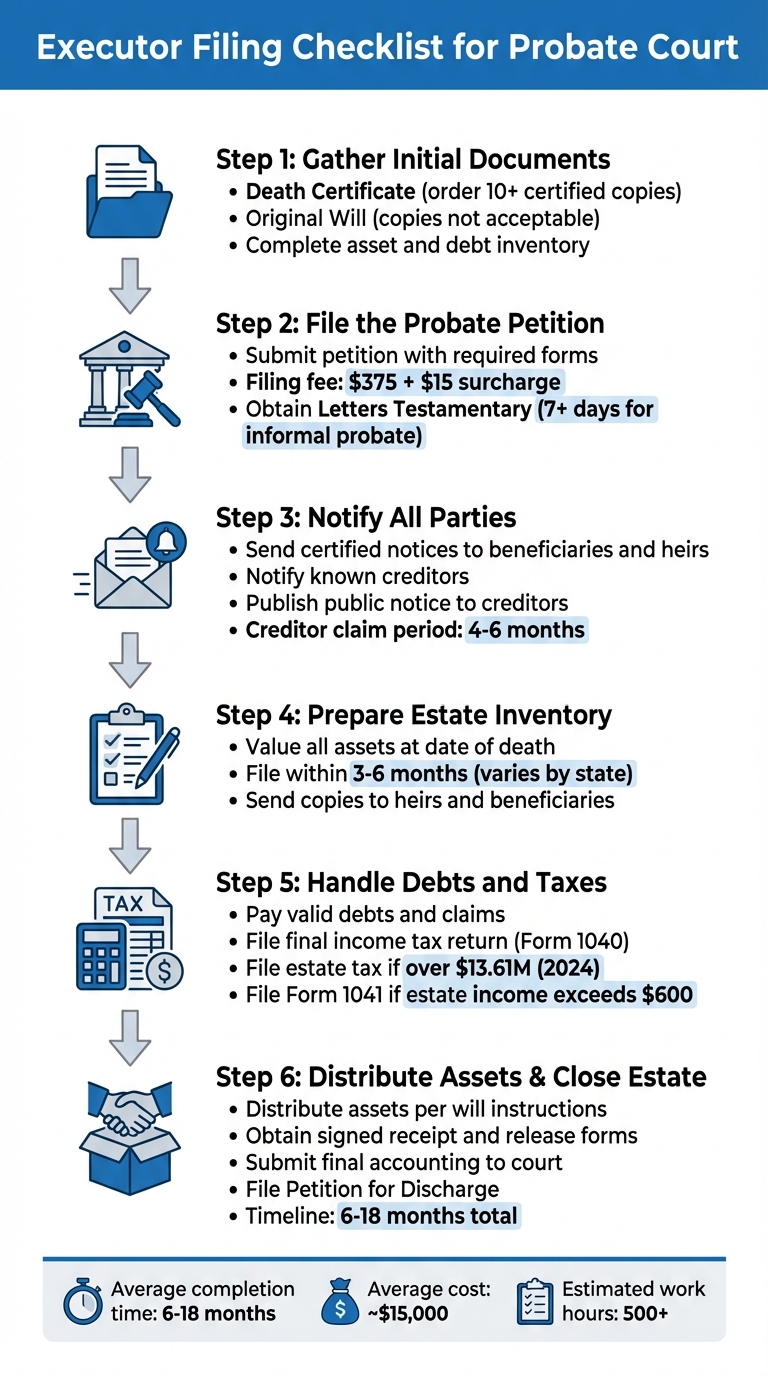 {6-Step Executor Probate Filing Process Checklist}
:::
{6-Step Executor Probate Filing Process Checklist}
:::
How Do You File Probate Court Documents Correctly? - Your Civil Rights Guide
Step 1: Gather Initial Documents
Before heading to probate court, it’s crucial to collect all the necessary documents that confirm the death, establish your authority, and provide a clear picture of the estate's assets and debts.
Death Certificate
The certified death certificate is a must-have. It’s required to begin the probate process, claim insurance benefits, file final tax returns, and transfer property titles [2][8]. You’ll need original certified copies with official seals and signatures for most of these tasks.
Order at least 10 certified copies upfront. Christian Lord, a Financial Advisor at Morgan Stanley, emphasizes:
"You need to purchase multiple copies of the certified death certificate - for banks, insurance companies, credit providers, and others. Be sure to get at least 10 copies" [10].
You can typically obtain these through the funeral home (often the fastest option), your local town clerk or county recorder, your state’s vital records office, or online services like VitalChek [10][9].
Every organization you deal with - probate court, Social Security, banks, and others - will likely need its own certified copy. Running out of copies could slow everything down.
The Decedent's Will
To start probate, the court requires the original will. Copies are generally not acceptable [7][2]. Look for the will in the decedent’s safe deposit box, attorney’s office, or personal files. If the original is missing, some jurisdictions may allow you to file a statement of its contents, but this can complicate matters [3].
Once located, confirm that it’s the most recent version and ensure it meets your state’s legal requirements for signatures and witnesses. The will is critical - it names the executor and outlines how the estate’s assets should be distributed, giving you the authority to act.
List of Assets and Debts
A thorough inventory of the decedent’s assets and debts is essential. Start by searching their home for financial documents, tax returns, and recent mail. Check emails for notifications about online banking or investment accounts [11][2].
Reach out to financial institutions directly to confirm account balances and inquire about safe deposit boxes. Search county records for real estate deeds, and don’t forget to check your state’s unclaimed property database for overlooked accounts [11]. Family members, the decedent’s attorney, or their financial planner may also provide valuable insight into assets you might otherwise miss.
"Identifying the deceased's assets ensures the estate is timely and properly administered and distributed." – The Probate Pro [11]
Organize your inventory into categories:
- Real estate: Include full legal descriptions from deeds.
- Vehicles: Note the year, make, model, and VIN.
- Financial accounts: Record date-of-death balances.
- Investments: Include stocks, bonds, or other holdings.
- Personal property: Group ordinary items like clothing and furniture together, but list high-value items - such as antiques, jewelry, or art - separately [12].
For debts, document mortgages, credit card balances, outstanding loans, and any liens [11][12]. A detailed inventory will not only simplify your probate petition but also help with the estate’s formal inventory filing.
With these documents in hand, you’ll be ready to move forward and file your probate petition in the next step.
Step 2: File the Probate Petition
After gathering the necessary documents in Step 1, the next step is to file your petition to officially open the probate case and assume your role as executor.
Complete and Submit the Probate Petition
The probate petition is your formal request for the court to open the estate and appoint you as executor. In Massachusetts, you’ll use either Form MPC 160 for formal probate or Form MPC 150 for informal probate. The petition must be filed in the county where the deceased person lived or where their property is located [3] [13]. The choice between formal and informal probate depends on the complexity of the estate. Formal probate is best for cases involving disputes or legal complications, while informal probate is a quicker, administrative process handled by a magistrate.
When submitting your petition, you’ll need to include the following documents:
- The original will
- A certified copy of the death certificate
- Lists of heirs and devisees (Forms MPC 162 and MPC 163)
- A Bond (Form MPC 801), even if the will waives surety requirements [3] [6] [13]
If not all interested parties agree to your petition, you’ll also need to file a Military Affidavit [3] [13].
Verification of documents is mandatory, meaning you must swear or affirm their accuracy under penalty of perjury [1]. Be aware that providing false information can lead to serious legal issues.
Filing fees in Massachusetts are $375 for both formal and informal probate, plus a $15 probate surcharge [3] [13]. If you’re filing for formal probate, there’s an additional $15 citation fee [3]. Many courts now allow eFiling in addition to traditional filing methods [3] [13].
Once your petition and supporting documents are submitted and verified, the court will issue Letters Testamentary, granting you the legal authority to manage the estate.
Obtain Letters Testamentary
After the court approves your petition, it will issue Letters Testamentary. These documents officially grant you the authority to handle the estate, including collecting assets, paying debts, and distributing property to beneficiaries [1] [3].
For informal probate, a magistrate can issue Letters Testamentary as soon as 7 days after the decedent’s death [13] [1]. Formal probate, however, takes longer, as it requires a judge to review the case and ensure all interested parties are properly notified.
Before appointing you, the court will require formal notice to be sent to all interested parties and, in some cases, a public notice published in a local newspaper [3] [13].
Once the judge or magistrate signs the Decree or Order, you’ll receive your Letters Testamentary. It’s important to obtain certified copies, as banks, insurance companies, and other institutions will require them before granting access to the decedent’s assets.
With your Letters Testamentary in hand, you’re now legally authorized to proceed with the next steps in the probate process, including notifying beneficiaries, heirs, and creditors.
Step 3: Notify Beneficiaries, Heirs, and Creditors
Once you’ve secured your Letters Testamentary in Step 2, it’s time to notify all beneficiaries, heirs, and creditors. This step is crucial because it protects their rights and sets deadlines for any claims. Acting promptly ensures the probate process stays on track.
Send Formal Notices
Start by sending written notices to beneficiaries, heirs-at-law, and any known creditors. Creditors could include banks, credit card companies, mortgage lenders, or service providers with outstanding bills [14]. To identify creditors you might not be aware of, file a change of address with the Post Office to forward the decedent’s mail. This can help you uncover recurring bills or open accounts [14].
Send these notices via certified or registered mail with a return receipt to provide proof for the court [5]. If any parties sign a Waiver of Notice, make sure to file it with the court.
Additionally, notify government agencies to prevent overpayments and guard against identity theft. For instance, contact the Social Security Administration immediately to stop benefits - any payments made for the month of death or afterward must be returned. Don’t forget to inform the Department of Motor Vehicles, state Medicaid offices, and credit reporting agencies as well [14].
Publish a Notice to Creditors
For creditors you can’t identify directly, publishing a public notice is the next step. Each state has specific rules for this process, but generally, you’ll need to place a Notice to Creditors in a local newspaper approved by your court. This serves as a legal safety net, ensuring the estate is protected from late claims once probate concludes [14]. To confirm the correct newspaper and publication timeline, check with your court clerk.
After the notice is published, the newspaper will issue a Publisher’s Affidavit, which you must file with the court as proof [5].
"A creditor may have an argument for making a valid claim against the estate after the probate case has been closed if they were not given proper notice of probate." - Justia [14]
Once the notice is out, creditors usually have four to six months to file claims, though this period may vary depending on the state [5]. Proper notification is essential because failing to notify creditors correctly can leave the estate open to late claims, even after probate has closed.
sbb-itb-fc184bb
Step 4: Prepare and File the Estate Inventory
Once you've gathered the necessary documents and sent out notifications, the next critical step is creating a detailed inventory of the estate's assets. This inventory is essential for the court to review and confirm the estate’s solvency and tax responsibilities [15]. Keep in mind that this process can be both intricate and time-consuming [15].
Value the Estate
Start by determining the fair market value of every asset as of the date of death [15] [17]. For real estate, you’ll need to include the property address, legal description, a copy of the deed, and its fair market value [15] [18]. For financial accounts, list the institution name, account number, and the exact balance on the date of death [15] [18]. Don’t overlook less obvious assets like unpaid wages, commissions, unexercised stock options, or tax refunds [15] [18].
When it comes to vehicles, document details such as the make, model, year, mileage, and VIN. For household items, group them together and estimate their collective value, but list high-value items individually [17]. If the estate includes more complex assets - like business interests or unique properties - you may need to hire a professional appraiser to ensure accurate valuations [15].
"The appraisal values included in the Inventory and Appraisal determine the statutory fees that are paid at the closing of probate." - Maya Powers, Estate Planning Content Expert, Trust & Will [18]
Once all assets have been assessed and valued, you’ll be ready to file the inventory with the court.
Submit the Inventory to the Court
Filing deadlines for the inventory vary by state. Most require submission within three to six months of the decedent's death, though some jurisdictions, like Vermont, mandate filing within just 30 days of appointment [15] [16]. Confirm the specific deadlines for your state and obtain the correct inventory form from your local probate court clerk [15].
Submit the completed inventory using the court’s preferred method and pay any required fees [15]. Additionally, you’ll need to send a copy to all heirs and beneficiaries as required by law [5]. Keep copies of all appraisals and valuations for your records. If you discover new assets after the initial filing, you’ll need to submit an amended inventory to the court [15].
Step 5: Handle Debts, Taxes, and Claims
Before distributing any assets, it’s essential to settle all outstanding debts, file necessary tax returns, and address any claims. This ensures the estate is properly managed and protects you from potential personal liability.
Pay Valid Debts and Claims
Start by reviewing the decedent’s financial records to identify any recurring bills, credit accounts, or outstanding loans. Reach out to creditors such as mortgage lenders, utility companies, and healthcare providers to confirm any balances due.
If you haven’t already published a public notice for unknown creditors (as outlined in Step 3), make sure to do so now. This step is necessary to notify any unidentified creditors. Typically, creditors have four to six months to file claims after receiving formal notice. In some states, like Georgia, creditors must submit their claims within three months of the final public notice publication [5].
Once claims are received, evaluate each one carefully. Confirm the validity of the claims before approving payments, and negotiate settlements if needed. If the estate’s funds are limited, prioritize payments in the following legal order: funeral expenses and taxes first, followed by unsecured debts. Always use a separate estate bank account for these transactions to keep estate funds distinct from your personal finances.
"As Personal Representative (PR) or executor of an estate... you may be held personally liable for any loss suffered as a result of your failure to properly administer the estate." - Probate Court of Hall County
If the estate’s debts outweigh its assets, you may need to petition the court to declare the estate insolvent. This step can shield you from personal responsibility for any unpaid debts.
File Estate Tax Returns
To handle tax obligations, apply for a Federal Employer Identification Number (EIN) using Form SS-4. This EIN is necessary to open an estate bank account and file tax documents. Additionally, submit Form 56 to inform the IRS that you are authorized to manage the decedent’s estate.
The decedent’s final individual income tax return (Form 1040) must be filed by the tax deadline of the year following their death. If the estate generates over $600 in annual income - such as from interest, dividends, or rental properties - you’ll also need to file Form 1041 (U.S. Income Tax Return for Estates and Trusts) [19].
For estates valued at $13.61 million or more (as of 2024), federal estate taxes may apply [4]. Be sure to check your state’s specific requirements for estate or inheritance taxes, as they may differ. If additional time is needed, you can request a six-month extension for filing and payment using Form 4768.
"The laws on estate and gift taxes are considered to be some of the most complicated in the Internal Revenue Code. For further guidance, we strongly recommend that you visit with an estate tax practitioner." - Internal Revenue Service
Keep meticulous records of all financial transactions, including receipts and canceled checks for funeral costs, medical bills, and other settled debts. Since the IRS can pursue unpaid taxes for up to 10 years, detailed documentation is crucial.
Once you’ve resolved all debts and tax obligations, you can move forward with distributing the estate’s assets.
Step 6: Distribute Assets and File Final Accounting
Once debts and taxes are settled, the final steps in the probate process involve distributing assets to beneficiaries and preparing a detailed record of all transactions.
Distribute Assets to Beneficiaries
Before distributing any assets, ensure all obligations - such as funeral costs, administrative fees, creditor claims, and taxes - are fully paid. Distributing funds prematurely can lead to personal liability if the estate cannot cover its tax obligations [4].
Start by addressing specific bequests outlined in the will, then move on to dividing the residuary estate [21].
"The final distribution is where the Executor or Administrator transfers any remaining probate assets to the estate beneficiaries." - Maya Powers, Estate Planning Content Expert, Trust & Will [21]
For real property, use an Executor's deed to transfer ownership. Personal property can be handed over directly or sold if beneficiaries decline it. Financial assets may need to be either liquidated or transferred, depending on the situation [21].
Keep in mind that distribution procedures can vary depending on local laws. Some jurisdictions require court approval, while others allow the will to guide the process directly [21]. For example, in California, you must file a petition for final distribution within 12 months of receiving Letters of Administration - or within 18 months if federal taxes are involved [21].
Always document asset transfers. Have every beneficiary sign a "receipt and release" form to confirm they’ve received their inheritance and to release you from future liability [23]. Store these signed documents with the estate records for safekeeping.
After completing the asset distribution, prepare a thorough final accounting that records every financial transaction made during the probate process.
Submit the Final Accounting
The final accounting is a detailed report of every transaction related to the estate, including income, expenses, and distributions. Unlike the initial inventory, which lists the estate's starting assets, this document tracks the complete financial activity of the estate [23].
Include all income earned by the estate, every expense paid, and the details of distributions to beneficiaries. If executor fees apply, make sure to include those as well [22][23].
"Accurate record-keeping prevents disputes and simplifies reporting to beneficiaries." - Maya Powers, Estate Planning Content Expert, Trust & Will [23]
Attach supporting documents - such as receipts, bank statements, and tax records - to verify every entry. Beneficiaries have the right to review this documentation, which also protects you in case your management of the estate is questioned [23].
Many probate courts provide standardized forms for final accounting. Check with your local court clerk to obtain the appropriate forms, often called "Final Return" or "Final Accounting" [23][5]. Alongside the accounting, file a Petition for Discharge, which formally requests the court to close the estate and release you from your fiduciary responsibilities [24][5].
In some states, beneficiaries can waive the need for a formal accounting if everyone agrees, which can expedite the process [23]. However, presenting a comprehensive summary to beneficiaries is recommended to avoid disputes later. Share the final accounting with heirs for their approval before submitting it to the court [20].
Once the court approves the final accounting, you can move on to the Final Checklist Review. The entire probate process typically spans six to 18 months from start to finish [4].
Closing the Probate Estate
Final Checklist Review
Before wrapping up the probate process, it's essential to ensure every critical step has been completed. This includes obtaining the death certificate and will, filing the probate petition, securing Letters Testamentary, notifying both beneficiaries and creditors, submitting an inventory of the estate, settling debts and taxes, and finally, distributing assets. This review acts as a safety net to ensure nothing has been overlooked before officially closing the estate.
In Massachusetts, the final step involves filing for the "close of probate" and obtaining a "release of liability and responsibility" [25]. This court-issued discharge protects you from potential future claims once the final accounting is approved. On average, the probate process in Massachusetts takes about a year to complete [2], though estates with more complexities may take longer.
"A final accounting must be filed with the probate court, detailing all income, expenditures, and distributions related to the estate."
– Surprenant, Beneski & Nunes, P.C. [24]
Throughout the process, keeping detailed and organized records is crucial. Settling an estate often requires over 500 hours of work and costs around $15,000 [25]. Accurate documentation - such as receipts, bank statements, tax returns, and signed beneficiary releases - can simplify the final accounting and provide protection if any disputes arise. For more intricate tasks like tax returns or court filings, hiring an attorney or CPA is a smart move, as their fees can usually be paid from the estate.
By staying organized and thorough, you can confidently close the estate while minimizing risks.
How LeadList.Pro Helps Executors and Real Estate Professionals

Navigating the probate process can be overwhelming, but tools like LeadList.Pro are designed to assist executors and real estate professionals. For those in Massachusetts, probate filings often lead to opportunities for real estate professionals to assist executors who may need to sell property to settle debts or distribute assets among heirs. LeadList.Pro simplifies this by providing weekly probate and preforeclosure leads directly from Massachusetts probate courts, enhanced with AI-driven insights and manual verification.
These leads include comprehensive details such as property and contact information, decedent data, attorney contacts, and AI-generated distress scores to help prioritize outreach. Delivered in an organized CSV format, the service allows users to focus on specific counties, with plans starting at $99/month for smaller counties like Dukes and Franklin, and $249/month for larger counties like Middlesex and Worcester. Each subscription includes AI Street View Analysis and comes with no long-term commitments, giving you immediate access to verified probate data as soon as estates are filed in court.
For executors and professionals alike, LeadList.Pro offers a streamlined way to manage the complexities of probate while uncovering new opportunities.
FAQs
::: faq
What happens if an executor doesn’t notify all creditors during probate?
Failing to notify every creditor during probate can create significant problems. Creditors who aren't informed might file claims later, which could stall the probate process or spark disputes. Even worse, the executor might face personal liability if their oversight causes financial harm to the estate or its beneficiaries.
To prevent these complications, executors must meet all legal obligations for notifying creditors. This usually involves publishing a public notice and directly informing known creditors. Working with a probate attorney can help ensure that every step is handled correctly and within the required timeframes. :::
::: faq
How can an executor determine if an estate requires formal or informal probate?
To see if an estate can go through informal probate, the executor needs to ensure a few key things:
- The original will is available.
- The official death certificate is in hand.
- The identities and whereabouts of all heirs and devisees are known.
- The personal representative has the legal priority to be appointed.
If these boxes are checked, the estate can usually proceed with informal probate. This process tends to be quicker and avoids court hearings. On the other hand, if any of these requirements aren’t met - like a missing will, unknown heirs, or a personal representative lacking priority - the estate will need to go through formal probate. Formal probate means court involvement, hearings, and extra paperwork to handle the estate properly. :::
::: faq
What should an executor do if the original will is missing?
If the original will is missing, the executor should start by conducting a thorough search. Look in places where the deceased might have kept important documents - like a safe-deposit box, personal files at home, or with their attorney. If the will still can't be located, the estate may have to be handled as if no valid will exists.
To initiate the probate process, the executor needs to file a petition with the court. This could be a Petition for Informal Probate or Letters of Administration, depending on the specific rules of the state. In some cases, courts might accept a copy of the will if enough evidence is provided to confirm its validity. Executors are also responsible for notifying all interested parties, such as heirs and creditors, and must follow state-specific rules for publishing notices.
Even without the original will, following these steps ensures the estate is managed according to legal procedures. Be sure to review the guidelines and forms required by your local probate court for accurate filing. :::


